Create a SadConsole game: Part 4 - Objects
In this part of the tutorial, you upgrade the map from a simple surface to a dedicated class that creates and manages game objects.
Previous articles in this tutorial:
Prerequisites
Section titled “Prerequisites”This part of the tutorial continues where the previous one left off. If you don’t have your code handy, you can download it now.
Check bounds
Section titled “Check bounds”Currently, the game crashes if you move the character off the screen. Add bounds checking so the game object validates its position before moving. You can do that in two places:
-
Outside of the game object.
By checking the bounds of the map before the game object is moved, you prevent the game object from entering a non-existent map tile. However, this means that you need to make sure you always check for map bounds before you call
GameObject.Move. You could easily forget to do this if you have multiple code paths that could move a game object. -
Inside the game object.
You can modify the
GameObject.Movemethod to check for map bounds, returning a Boolean value to indicate whether the move was successful or not. However, this means theGameObjectneeds access to the map data to understand the bounds of the map.
For now, the GameObject.Move method receives the map surface, so you can quickly check if the desired position is within the bounds of the surface. It’s logical to check for the bounds of the map inside the game object.
-
Open the GameObject.cs file.
-
Find the
Movemethod and change the return type fromvoidtobool:public bool Move(Point newPosition, IScreenSurface screenSurface) -
Next, use the
screenSurface.Surface.IsValidCellmethod to check if thenewPositionis a valid cell position, and returntrueorfalsebased on that result:public bool Move(Point newPosition, IScreenSurface screenSurface){// Check new position is validif (!screenSurface.Surface.IsValidCell(newPosition.X, newPosition.Y)) return false;// Restore the old cell_mapAppearance.CopyAppearanceTo(screenSurface.Surface[Position]);// Store the map cell of the new positionscreenSurface.Surface[newPosition].CopyAppearanceTo(_mapAppearance);Position = newPosition;DrawGameObject(screenSurface);return true;}
Now, run the code and try moving the player object off the side of the screen. Notice that the player object simply stays where it was when the new position is invalid.
A proper map
Section titled “A proper map”Soon you’ll add more game object types such as monsters and treasure. However, adding more game objects and logic presents a problem: where to store all that information. Currently, you’ve been working in the RootScreen class, which composed the game screen. But with more game object types, lifecycle management, and collision handling, you need a class that better represents the game map.
-
Add a new class named Map.cs.
-
Paste the following code. This code is all the map related code from RootScreen.cs to this new class, modified slightly.
using System.Diagnostics.CodeAnalysis;namespace SadConsoleGame;internal class Map{private ScreenSurface _mapSurface;public ScreenSurface SurfaceObject => _mapSurface;public GameObject UserControlledObject { get; set; }public Map(int mapWidth, int mapHeight){_mapSurface = new ScreenSurface(mapWidth, mapHeight);_mapSurface.UseMouse = false;FillBackground();UserControlledObject = new GameObject(new ColoredGlyph(Color.White, Color.Black, 2), _mapSurface.Surface.Area.Center, _mapSurface);}private void FillBackground(){Color[] colors = new[] { Color.LightGreen, Color.Coral, Color.CornflowerBlue, Color.DarkGreen };float[] colorStops = new[] { 0f, 0.35f, 0.75f, 1f };Algorithms.GradientFill(_mapSurface.FontSize,_mapSurface.Surface.Area.Center,_mapSurface.Surface.Width / 3,45,_mapSurface.Surface.Area,new Gradient(colors, colorStops),(x, y, color) => _mapSurface.Surface[x, y].Background = color);}}This code is slightly different from the previous RootScreen.cs code, with the following changes:
- The variable that represented the game map surface was renamed from
_mapto_mapSurface. - The game map surface is exposed publicly through the get-only
SurfaceObjectproperty. - The
_controlledObjectvariable held the player object, but now that’s a public property namedUserControlledObject. - The
System.Diagnostics.CodeAnalysisnamespace is imported at the top of the file. This is described later.
- The variable that represented the game map surface was renamed from
-
Next, update the code in RootScreen.cs, removing the code ported to the new map object. This class still handles the keyboard input though. Replace the code in the class with the following:
using SadConsole.Input;namespace SadConsoleGame;internal class RootScreen: ScreenObject{private Map _map;public RootScreen(){_map = new Map(Game.Instance.ScreenCellsX, Game.Instance.ScreenCellsY - 5);Children.Add(_map.SurfaceObject);}public override bool ProcessKeyboard(Keyboard keyboard){bool handled = false;if (keyboard.IsKeyPressed(Keys.Up)){_map.UserControlledObject.Move(_map.UserControlledObject.Position + Direction.Up, _map.SurfaceObject);handled = true;}else if (keyboard.IsKeyPressed(Keys.Down)){_map.UserControlledObject.Move(_map.UserControlledObject.Position + Direction.Down, _map.SurfaceObject);handled = true;}if (keyboard.IsKeyPressed(Keys.Left)){_map.UserControlledObject.Move(_map.UserControlledObject.Position + Direction.Left, _map.SurfaceObject);handled = true;}else if (keyboard.IsKeyPressed(Keys.Right)){_map.UserControlledObject.Move(_map.UserControlledObject.Position + Direction.Right, _map.SurfaceObject);handled = true;}return handled;}}The code here creates the map, adds the map surface to the SadConsole object’s children, and handles the keyboard.
Run the game. Everything still runs as expected. You’ve just reorganized the code.
More objects
Section titled “More objects”Now that movement works well, add a treasure and monster game object. When the player comes into contact with the treasure, the player collects it. If the player comes into contact with a monster, the player is hurt.
First, the map needs to create these new objects.
-
Open the Map.cs file.
-
Add a new private field named
_mapObjectsto hold the collection of game objects. The game objects should be exposed through a public property namedGameObjects:internal class Map{private List<GameObject> _mapObjects;private ScreenSurface _mapSurface;public IReadOnlyList<GameObject> GameObjects => _mapObjects.AsReadOnly();public ScreenSurface SurfaceObject => _mapSurface;public GameObject UserControlledObject { get; set; }// ... other code ...Notice that
GameObjectsis a read-only list. This lets code outside of the map know about what objects are on the map, but the map itself should control adding and removing game objects. -
Next, update the
Mapconstructor to initialize the_mapObjectscollection:public Map(int mapWidth, int mapHeight){_mapObjects = new List<GameObject>();// ... other code ...}
Treasure
Section titled “Treasure”Now that the map can contain other objects, create a treasure object.
-
Open the Map.cs file.
-
Add the following method to the
Mapclass:private void CreateTreasure(){// Try 1000 times to get an empty map positionfor (int i = 0; i < 1000; i++){// Get a random positionPoint randomPosition = new Point(Game.Instance.Random.Next(0, _mapSurface.Surface.Width),Game.Instance.Random.Next(0, _mapSurface.Surface.Height));// Check if any object is already positioned there, repeat the loop if foundbool foundObject = _mapObjects.Any(obj => obj.Position == randomPosition);if (foundObject) continue;// If the code reaches here, we've got a good position, create the game object.GameObject treasure = new GameObject(new ColoredGlyph(Color.Yellow, Color.Black, 'v'), randomPosition, _mapSurface);_mapObjects.Add(treasure);break;}}This code does the following:
- Gets a random position on the map.
- Makes sure that no other game object is located at that position.
- Creates the treasure game object.
-
Next, call
CreateTreasurefrom the map constructor to create one treasure:public Map(int mapWidth, int mapHeight){_mapObjects = new List<GameObject>();_mapSurface = new ScreenSurface(mapWidth, mapHeight);_mapSurface.UseMouse = false;FillBackground();UserControlledObject = new GameObject(new ColoredGlyph(Color.White, Color.Black, 2), _mapSurface.Surface.Area.Center, _mapSurface);CreateTreasure();}
If you run the game, you’ll see a treasure object on the map. If you walk the player character over it, nothing happens. You add collision logic later in this article.
Monster
Section titled “Monster”Similar to the treasure, add a method to create a monster object:
-
Open the Map.cs file.
-
Add the following method to the
Mapclass:private void CreateMonster(){// Try 1000 times to get an empty map positionfor (int i = 0; i < 1000; i++){// Get a random positionPoint randomPosition = new Point(Game.Instance.Random.Next(0, _mapSurface.Surface.Width),Game.Instance.Random.Next(0, _mapSurface.Surface.Height));// Check if any object is already positioned there, repeat the loop if foundbool foundObject = _mapObjects.Any(obj => obj.Position == randomPosition);if (foundObject) continue;// If the code reaches here, we've got a good position, create the game object.GameObject monster = new GameObject(new ColoredGlyph(Color.Red, Color.Black, 'M'), randomPosition, _mapSurface);_mapObjects.Add(monster);break;}}This code is only slightly different from
CreateTreasure, where the color of the object is Red and the character is M. -
Next, call
CreateMonsterfrom the map constructor to create one monster:public Map(int mapWidth, int mapHeight){_mapObjects = new List<GameObject>();_mapSurface = new ScreenSurface(mapWidth, mapHeight);_mapSurface.UseMouse = false;FillBackground();UserControlledObject = new GameObject(new ColoredGlyph(Color.White, Color.Black, 2), _mapSurface.Surface.Area.Center, _mapSurface);CreateTreasure();CreateMonster();}
Now when you run the game, you’ll see both the monster and the treasure on the map.
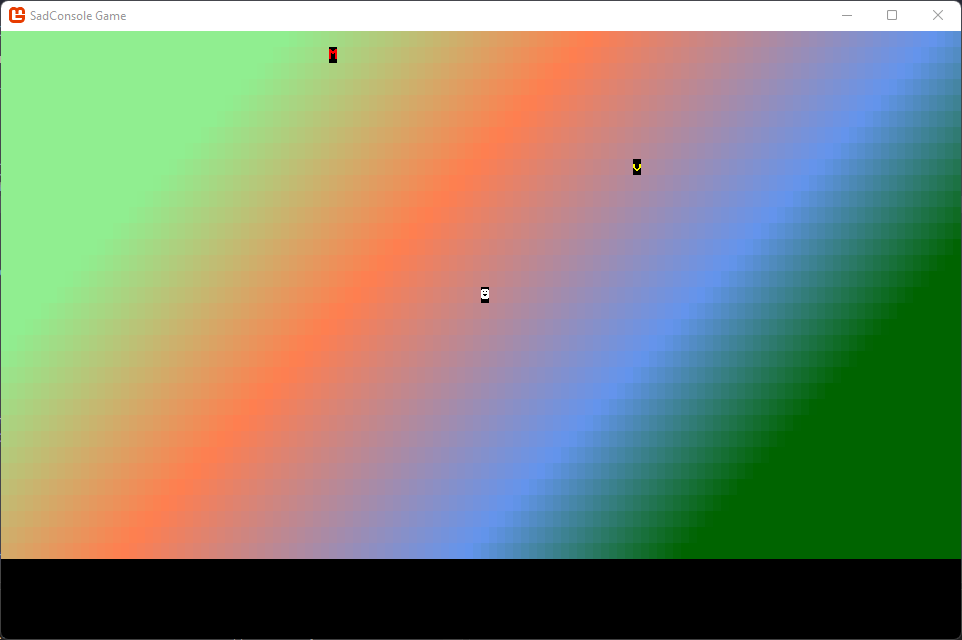
Collision
Section titled “Collision”Now that you have multiple game objects, you need to handle collision between objects. When the player moves on top of a treasure, the code needs to know about it and collect that treasure. For now, just remove the treasure from the map. Add a few more methods to the GameObject.cs class to support these capabilities.
-
Open the GameObject.cs file.
-
Add a new method named
Touchedwhich is called when another game object touches the current one:public virtual bool Touched(GameObject source, Map map){return false;}Right now this method returns false. It’s also created as a
virtualmethod, which is described later. The return value indicates whether thesourcegame object can move into the position of the current object. Iffalseis returned, thesourceobject can’t, whiletrueindicates that it can. -
Update the
Movemethod to use theMapas a parameter instead of theIScreenSurface. Rename the parameter fromscreenSurfacetomapChange each reference of
screenSurface(the old parameter) tomap.SurfaceObject, which is the map’s surface.public bool Move(Point newPosition, Map map){// Check new position is validif (!map.SurfaceObject.IsValidCell(newPosition.X, newPosition.Y)) return false;// Restore the old cell_mapAppearance.CopyAppearanceTo(map.SurfaceObject.Surface[Position]);// Store the map cell of the new positionmap.SurfaceObject.Surface[newPosition].CopyAppearanceTo(_mapAppearance);Position = newPosition;DrawGameObject(map.SurfaceObject);return true;}Next, the
Movemethod needs to check the map for other objects at the target position. You could code the lookup here inMove, or update the map code itself. It’s better to add this into the map itself because other parts of the game probably want to know if there’s an object at that specific part of the map. -
Open the RootScreen.cs file.
-
In the
ProcessKeyboardmethod, change the references from_map.SurfaceObjectto_map.For example, the Up direction would pass
_mapas the last parameterMovemethod:_map.UserControlledObject.Move(_map.UserControlledObject.Position + Direction.Up, _map);Change each
Movemethod. -
Open the Map.cs file.
-
Add a new method named
TryGetMapObject. This method takes a position, checks if any game object is at that position, and returns it if found. It uses theTryGetpattern, which returns a boolean to indicate whether it’s successful, and when successful, returns the object in theoutparameter.public bool TryGetMapObject(Point position, [NotNullWhen(true)] out GameObject? gameObject){// Try to find a map object at that positionforeach (var otherGameObject in _mapObjects){if (otherGameObject.Position == position){gameObject = otherGameObject;return true;}}gameObject = null;return false;}There are two C# concepts you might not be familiar with that this code introduces. Modern C# projects are created nullable aware. This means that code assumes you’re not going to use null, and that objects should always have assigned values. So, when you do use null, you mark it as such. When you declare a variable with the
?modifier, you’re indicating that it could be null.To help developers understand when null is expected,
System.Diagnostics.CodeAnalysiscontains many attributes that annotate your code with null expectations. In this case, you mark thegameObjectparameter with the[NotNullWhen(true)]attribute. Attributes are metadata assigned to any sort of code declaration. TheNotNullWhenattribute is reserved for method parameters and indicates that when eithertrueorfalseis returned, the parameter won’t be null. In this method, whentrueis returned, it indicates that thegameObjectparameter contains an instance of the game object at that position. -
Back in GameObject.cs, update the
Movemethod to check the map for any other object. If an object is found at that position, touch it. If the touch test returnsfalse, you can’t move into that position, so theMovemethod must also returnfalseto indicate that the movement failed.public bool Move(Point newPosition, Map map){// Check new position is validif (!map.SurfaceObject.IsValidCell(newPosition.X, newPosition.Y)) return false;// Check if other object is thereif (map.TryGetMapObject(newPosition, out GameObject? foundObject)){// We touched the other object, but they won't allow us to move into the spaceif (!foundObject.Touched(this, map))return false;}// Restore the old cell_mapAppearance.CopyAppearanceTo(map.SurfaceObject.Surface[Position]);// Store the map cell of the new positionmap.SurfaceObject.Surface[newPosition].CopyAppearanceTo(_mapAppearance);Position = newPosition;DrawGameObject(map.SurfaceObject);return true;}
Now try running the game. When you move the player character to the same position as another game object, it restricts you from moving into that position.
Conclusion
Section titled “Conclusion”After all these updates, your game is starting to take shape. In the next part of the tutorial, you explore how to create new types based on GameObject that know how to react to the Touched method.